Norfolk Island Pine Repotting Guide: Tips, Timing, and Best Practices
Master the essentials of repotting your Norfolk Island pine for healthy, thriving indoor growth year-round.

Norfolk Island Pine Repotting Guide: Ensuring Long-Term Plant Health
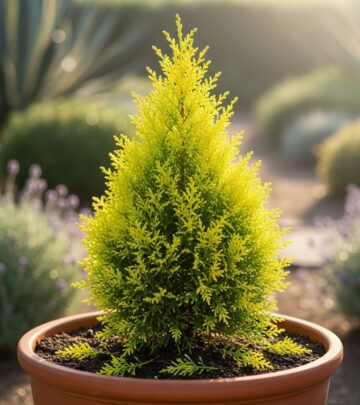
With its delicate, lacy foliage and symmetrical form, the Norfolk Island pine (Araucaria heterophylla) is a beloved houseplant in homes around the world. Whether given as a festive winter gift or grown as a year-round indoor specimen, proper repotting is crucial to ensure your tree remains healthy, attractive, and robust for many years. This guide explores optimal timing, the necessary steps, troubleshooting, and aftercare for repotting your Norfolk Island pine.
Understanding the Norfolk Island Pine’s Growth and Container Needs
Originating from the subtropical forests of Norfolk Island, this evergreen can reach towering heights outdoors, but indoors it typically tops out between 3 and 10 feet. As a slow-growing plant, it generally requires repotting only every two to four years. However, several signals indicate when it’s time to refresh its home, and careful handling is required to avoid damage to both the plant and its sensitive root system.
Why Repotting is Necessary
- Provides fresh, nutrient-rich soil
- Prevents root crowding and promotes better root health
- Helps prevent root rot by improving drainage
- Allows for continued growth and stability
When Should You Repot a Norfolk Island Pine?
Norfolk Island pines prefer minimal disturbance, so only repot when necessary. The best period is early spring, as the plant enters its active growing season. Signs that your plant needs repotting include:
- Roots visible above the soil surface or growing out the drainage holes
- Water runs straight through the pot, indicating rootbound soil
- Stunted or slowed growth despite care
- Yellowing or dropping needles without other causes
- The plant outgrowing its current container or becoming top heavy
Typically, repotting every two to four years is sufficient for a healthy tree, with younger, faster-growing plants on the shorter end of that range and mature, slower specimens on the longer end.
Choosing the Right Pot and Soil
Container Selection
When selecting a new pot, choose one that is only 2-3 inches (5-8 cm) wider in diameter than the present container. Avoid overly large pots, as they increase the risk of overwatering and root rot. Ensure your pot has adequate drainage holes.
Best Soil Mix for Norfolk Island Pine
- Use a light, well-draining potting mix; avoid heavy soils.
- Incorporate vermiculite or perlite to enhance drainage.
- A mix formulated for azaleas, pines, or cacti can be adapted by adding extra organic material if needed.
How to Repot a Norfolk Island Pine: Step-by-Step Instructions
Repotting requires careful handling, as the trunk may have small spikes and the root system is sensitive. Here’s how to proceed:
- Gather Supplies
- New container (2–3 inches larger, with drainage)
- Well-draining potting mix
- Gloves (for your protection)
- Watering can
- Small gardening trowel
- Prepare the New Pot
Add a layer of fresh soil mix to the bottom of the pot, enough to support the root ball so that it will sit at the correct final depth. - Remove the Pine Carefully
Gently tip the current container on its side. Loosen the soil at the edges. If needed, grasp the plant at the base of the trunk (not the branches) and pull with gentle twists. Avoid yanking or the trunk may bruise. - Inspect and Loosen the Roots
Check for circling or tangled roots, which indicate rootbound conditions. If necessary, gently tease roots free using your fingers or a clean tool. If roots are extremely tight, lightly score the root ball vertically to encourage outward growth. - Set at Proper Depth
Position the root ball so the top sits 2-3 inches (5–8 cm) below the new soil surface. Studies show the best growth and stability at this depth. Too shallow or too deep can stunt growth. - Fill with Fresh Soil
Add more soil around the root ball, gently tamping down to eliminate large air pockets. Maintain even pressure but do not compress tightly. - Water Thoroughly
Water until excess drains from the pot. This helps settle the soil and reduces post-transplant shock.
Aftercare: Helping Your Norfolk Island Pine Adjust
- Place the newly repotted pine in bright, indirect light but avoid direct sun or drafts for 1-2 weeks.
- Water sparingly until new growth resumes, then maintain even moisture (do not let soil become soggy).
- Raise humidity by misting branches daily or setting the pot on a pebble tray with water.
- Avoid fertilizing for the first few weeks after repotting.
- Inspect regularly for signs of stress (yellowing, wilting, leaf drop) and adjust care as needed.
Common Issues and Troubleshooting
| Problem | Possible Cause | Solution |
|---|---|---|
| Yellowing needles | Overwatering, poor drainage, or repotting shock | Check drainage, reduce watering, increase humidity |
| Rootbound plant (roots circling, thick mat) | Potted too long without replanting | Loosen root ball and repot in a slightly bigger pot |
| Stunted growth after repotting | Planted too deep or too shallow, root disturbance | Ensure correct planting depth (2–3 inches below surface) |
| Mold or fungus on soil | Poor airflow, overwatering, high humidity | Improve ventilation, allow soil surface to dry between waterings |
| Pest infestation (mealybugs, scale, spider mites) | Poor conditions, plant stress | Rinse foliage, use neem oil or insecticidal soap, isolate if needed |
Tips for a Thriving Norfolk Island Pine
- Avoid frequent repotting: Only repot when the plant is rootbound or soil is exhausted.
- Maintain high humidity: Pines prefer moist air, especially in heated indoor environments.
- Fertilize sparingly: Use a balanced, diluted houseplant fertilizer during spring and summer after the plant has recovered from repotting.
- Rotate occasionally: To maintain its symmetrical shape, rotate the pot every month.
- Protect from drafts: Avoid locations near air conditioners, heaters, or doors that are frequently opened in winter or summer.
Frequently Asked Questions (FAQs)
Q: How often should I repot my Norfolk Island pine?
A: Repot every two to four years, or when roots are seen pushing out of the drainage holes or surface, or if the plant looks stunted despite proper care.
Q: What is the best soil mix for repotting?
A: Use a light, well-draining mix with added vermiculite or perlite to support root health and prevent waterlogging.
Q: Can repotting harm my Norfolk Island pine?
A: The plant is sensitive to root disturbance. Repot gently, handle roots carefully, place at the correct depth, and allow time for recovery.
Q: Is it possible to keep a Norfolk Island pine small?
A: Yes, container growth naturally limits size. Prune with care, and avoid unnecessarily upsizing the pot.
Q: What pests or diseases should I watch for after repotting?
A: Common problems include spider mites, mealybugs, scale, and fungal issues—especially if the soil remains soggy. Rinse branches, use neem oil or insecticidal soap, and isolate the plant if needed.
Conclusion: Your Path to a Healthy Houseplant
With patience, the right soil and container, and gentle handling, your Norfolk Island pine will reward you with years of healthy growth. Whether it graces your living space as a festive centerpiece or a year-round accent, repotting thoughtfully ensures this unique tree thrives in your indoor garden.
Similar Articles


Read full bio of Sneha Tete