Arthrocentesis: Procedure, Preparation, and Aftercare
Comprehensive guide to arthrocentesis, including step-by-step procedure, preparation tips, risks, and post-procedure care to ensure patient safety.
Arthrocentesis: Step-by-Step Procedure, Preparation, and Aftercare
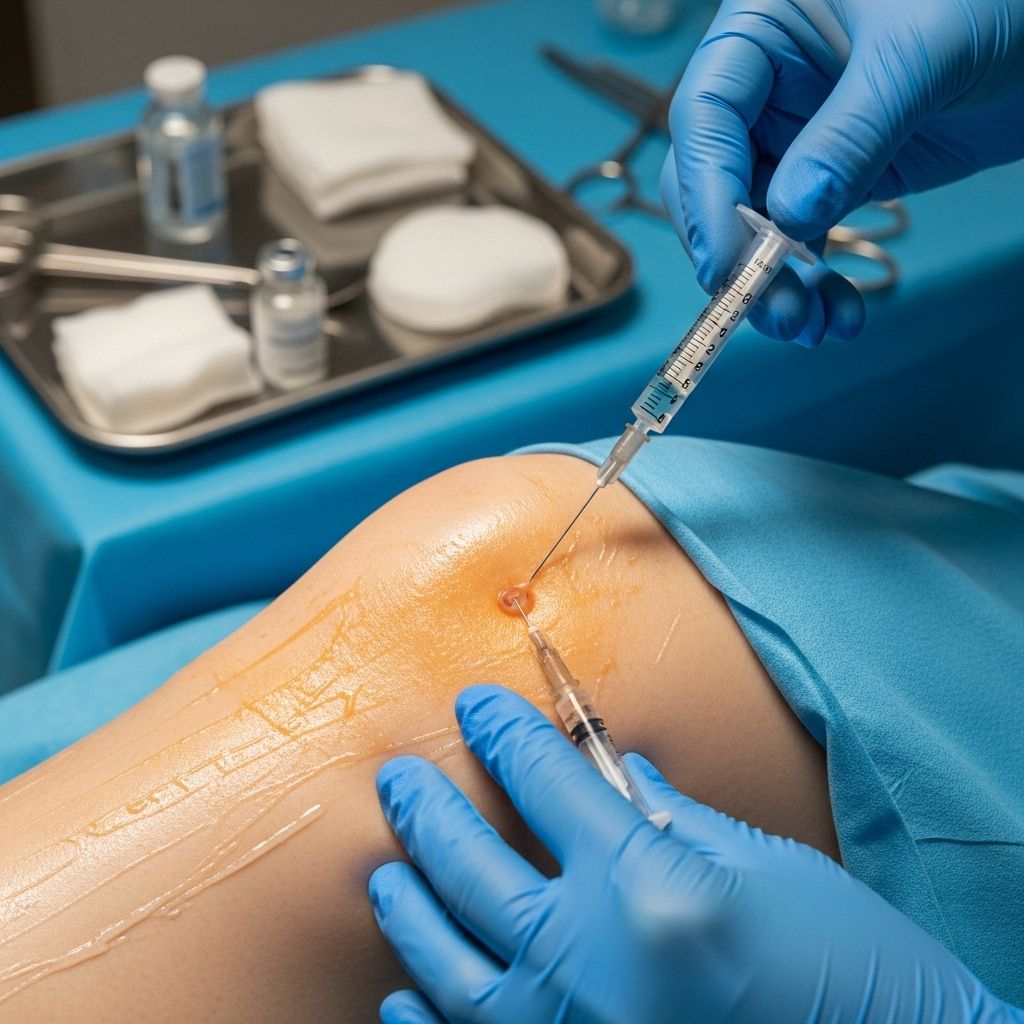
Arthrocentesis, also known as joint aspiration, is a medical procedure used to diagnose and treat conditions affecting the joints. The process involves removing synovial fluid from a joint space using a sterile needle and syringe. This detailed guide explains the procedure, what you need to know before and after arthrocentesis, potential risks, and answers frequently asked questions to ensure safe and effective care.
Overview of Arthrocentesis
Arthrocentesis is commonly performed to:
- Diagnose joint disorders or infections
- Relieve joint swelling and pain by draining excess fluid
- Administer medications directly into the joint (such as corticosteroids)
Common sites for arthrocentesis include the knee, shoulder, elbow, ankle, wrist, and hip.
Before the Procedure
Proper preparation for arthrocentesis helps minimize risks and ensures accurate test results and patient comfort.
Preparation Steps
- Inform your healthcare provider about all medications you are taking, especially blood thinners or anticoagulants.
- Mention any allergies, especially to local anesthetics, antiseptics, or latex.
- Discuss pre-existing conditions such as bleeding disorders or skin infections in the area to be aspirated.
- Fasting is generally not required, but always follow your doctor’s instructions regarding eating and drinking before the procedure.
- Arrange transportation if necessary, especially if sedation is being used.
Questions to Discuss With Your Doctor
- Why is arthrocentesis recommended in your case?
- What are the risks and benefits?
- Will you need pain relief, sedation, or local anesthesia?
- When can you expect results if the fluid is being sent for laboratory testing?
The Arthrocentesis Procedure
The arthrocentesis procedure typically takes place in a clinical or hospital setting and lasts only a few minutes. Below is a step-by-step outline of what to expect during the procedure:
Step-by-Step Process
- Positioning: The patient is positioned to best expose the affected joint, ensuring comfort and accessibility.
- Cleansing the Area: The skin over the joint is cleaned thoroughly with an antiseptic solution to minimize infection risk.
- Anesthesia:
- Local anesthetic may be injected to numb the area if necessary, reducing discomfort.
- Needle Insertion:
- A sterile needle is inserted through the skin into the joint space.
- Aspiration:
- Synovial fluid is withdrawn using a syringe attached to the needle.
- If required, medications (such as steroids) may be injected into the joint after fluid removal.
- Needle Removal and Dressing:
- The needle is carefully withdrawn, and pressure is applied to stop bleeding.
- A sterile bandage is placed over the site.
What You May Feel
- Mild discomfort or a stinging sensation during local anesthesia administration.
- Pressure or mild pain during needle insertion and as fluid is withdrawn.
- Most patients tolerate the procedure well, but some soreness may persist briefly afterward.
Indications for Arthrocentesis
A healthcare provider may recommend arthrocentesis in cases of:
- Swollen, painful joints with no clear cause
- Suspected joint infections (septic arthritis)
- Suspected crystal-induced arthritis (gout or pseudogout)
- Unexplained or sudden joint effusion (fluid buildup)
- Ruling out autoimmune or inflammatory disorders
- As part of treatment for certain joint conditions (removing excess fluid or injecting medication)
After the Procedure
Following arthrocentesis, specific aftercare steps help promote healing and prevent complications.
Post-Procedure Care
- Keep the bandage clean and dry; follow your provider’s instructions about when it may be removed.
- Limit vigorous activity with the affected joint for 24–48 hours.
- Apply ice packs to the area if you experience swelling or discomfort.
- Pain relievers, such as acetaminophen or ibuprofen, may be taken unless contraindicated.
- Monitor for signs of infection: increased redness, swelling, warmth, or persistent pain around the joint.
- Contact your provider if you develop a fever or notice unusual drainage from the site.
Possible Results
Fluid removed during arthrocentesis is often sent to a laboratory for analysis. Results may include:
- Cell counts: Help detect infection or inflammation
- Chemical analysis: May indicate gout or other disorders
- Gram stain and culture: Identify bacterial or fungal infections
- Crystal analysis: Detects uric acid crystals or calcium pyrophosphate dihydrate in gout or pseudogout
Your physician will review results and discuss implications for your diagnosis and treatment.
Risks and Complications
Although arthrocentesis is generally safe, risks may include:
- Infection at the needle insertion site or within the joint (rare with proper technique)
- Bleeding into the joint, especially for those with bleeding disorders
- Temporary pain or swelling
- Allergic reactions to anesthetic agents (uncommon)
- Injury to surrounding blood vessels, nerves, or structures (rare)
When to Seek Medical Help
- Rapidly worsening pain, swelling, redness, or warmth near the joint
- Fever or chills following the procedure
- Visible pus or drainage from the puncture site
- Numbness, tingling, or loss of movement in the affected limb
Frequently Asked Questions (FAQs) About Arthrocentesis
Q: Is arthrocentesis painful?
A: Most patients feel only mild discomfort. The use of local anesthetic can significantly reduce pain or sensations during the procedure.
Q: How long does arthrocentesis take?
A: The procedure generally lasts just a few minutes, depending on the complexity and number of joints involved.
Q: Are there alternatives to arthrocentesis?
A: Imaging tests such as ultrasound or MRI may show joint swelling but cannot provide a fluid sample for analysis; only arthrocentesis offers direct access for fluid evaluation or relief.
Q: When can I resume normal activities?
A: Most patients can resume everyday activities within a day, but strenuous activity with the affected joint should be avoided for 24–48 hours post-procedure.
Q: What are the signs of infection after arthrocentesis?
A: Watch for persistent redness, swelling, warmth, increased pain at the site, fever, or pus-like drainage, and notify your healthcare provider if these develop.
Q: What is done with the fluid removed from my joint?
A: The fluid is often sent to a laboratory, where it is analyzed for infection, inflammation, crystals, and other signs of disease.
Summary Table: Arthrocentesis Overview
| Aspect | Details |
|---|---|
| Definition | Removal of synovial fluid from a joint with a syringe and needle |
| Common Uses | Diagnosis, reliving swelling/pain, administering medications |
| Common Joint Sites | Knee, shoulder, elbow, ankle, wrist, hip |
| Type of Anesthesia | Local anesthesia usually applied |
| Typical Duration | 5–15 minutes |
| Possible Risks | Infection, bleeding, temporary pain, allergic reactions |
Patient Resources
- Ask your provider for written instructions about aftercare.
- Keep a record of your symptoms and any reactions following the procedure.
- Reach out to your healthcare provider with any concerns after the test.
Additional Notes
If you have questions about your particular situation or how to prepare for arthrocentesis, contact your healthcare provider. Arthrocentesis is an important tool for both diagnosing joint disorders and relieving painful symptoms, with a strong safety record when performed by trained professionals.
Read full bio of Sneha Tete

